Here is the short answer: hang your grow light at the right height, set a timer for the right number of hours, and give your plants the right intensity for their stage of growth. That is genuinely all there is to it. The tricky part is knowing what 'right' means for your specific plants and light, so this guide breaks it all down with real numbers you can use today.
How to Use Grow Lights: Step-by-Step Setup for Plants
Marcus Tillman
24 Mar 2026
Choosing the right grow light for your plants
Before you even plug anything in, you need the right tool for the job. The main light types you will encounter are LED panels, fluorescent or T5 tubes, compact fluorescent bulbs (CFLs), and HID lights (HPS or MH). For most home growers, LEDs and T5s are the practical choices. LEDs run cool, use less electricity, and last for years. T5 fluorescents are affordable and great for seedlings and low-light houseplants. HID lights are powerful but generate a lot of heat and are overkill for a windowsill herb garden.
The number that actually matters when choosing a light is PPFD, or photosynthetic photon flux density, measured in micromoles per square meter per second (μmol·m⁻²·s⁻¹). That is the amount of usable light hitting your plants. Seedlings and microgreens need roughly 100 to 150 μmol·m⁻²·s⁻¹. Lettuce and leafy greens do well at 150 to 200 μmol·m⁻²·s⁻¹. Most flowering houseplants and vegetables in the vegetative stage want somewhere in the 200 to 500 μmol·m⁻²·s⁻¹ range. A good LED panel or T5 fixture will list its PPFD output at a given distance on the spec sheet or box.
If you are growing a variety of plants, If you are growing a variety of plants, lean toward a <anchor>full-spectrum LED</anchor>. Full-spectrum lights cover the blue wavelengths that drive leafy growth and the <anchor>[red wavelengths that support flowering and fruiting](/grow-light-schedules/what-is-the-red-light-for-on-a-grow-light)</anchor>.. Full-spectrum lights cover the blue wavelengths that drive leafy growth and the red wavelengths that support flowering and fruiting. You do not need separate red or blue-only lights for home growing. A single, quality full-spectrum panel covers you for every stage.
Installation basics for grow lights (setup, mounting, spacing)
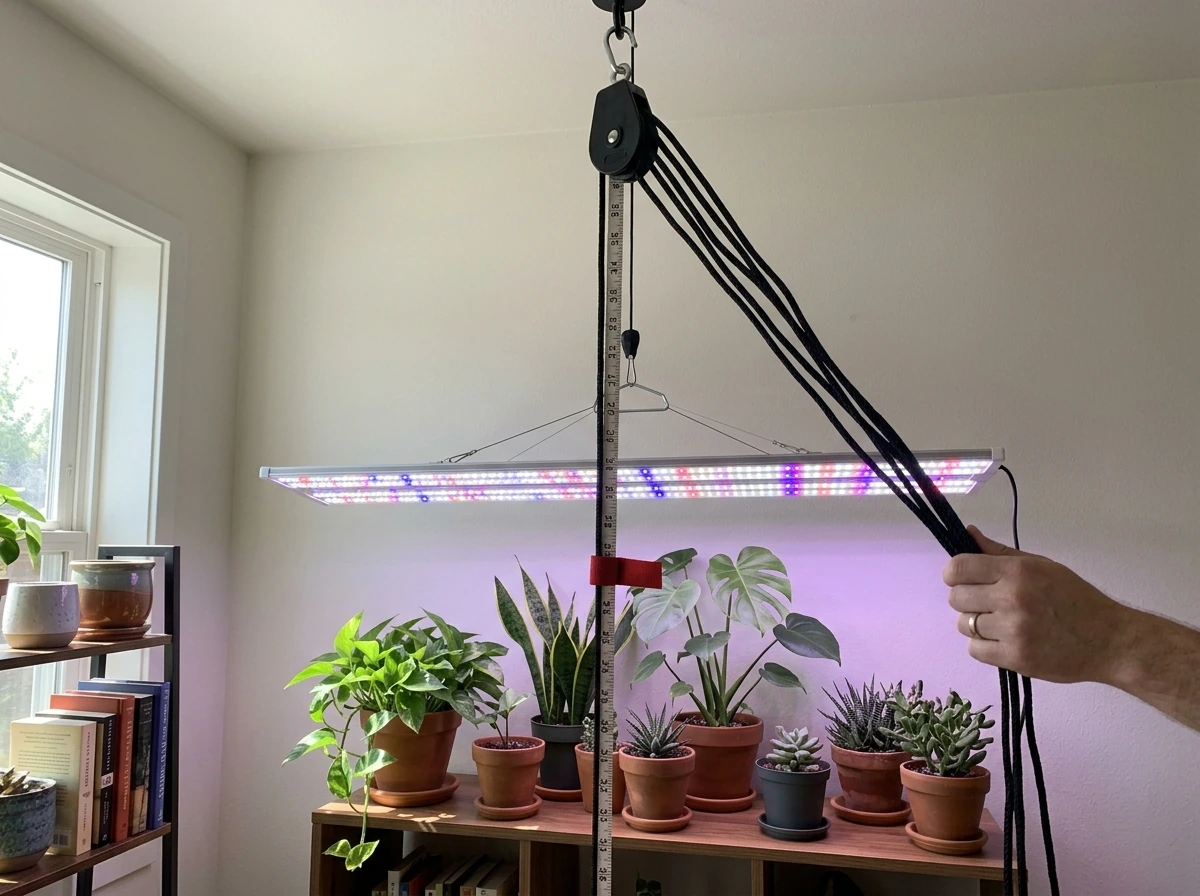
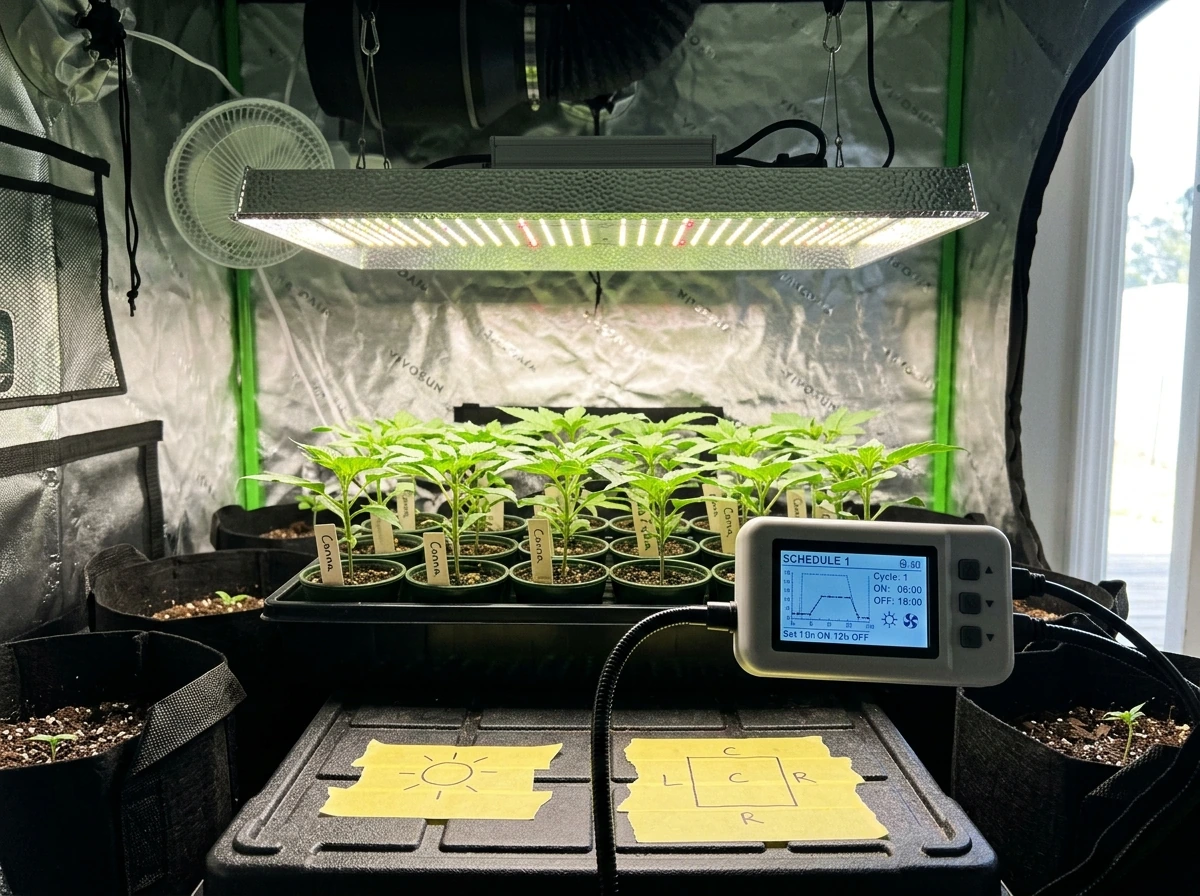
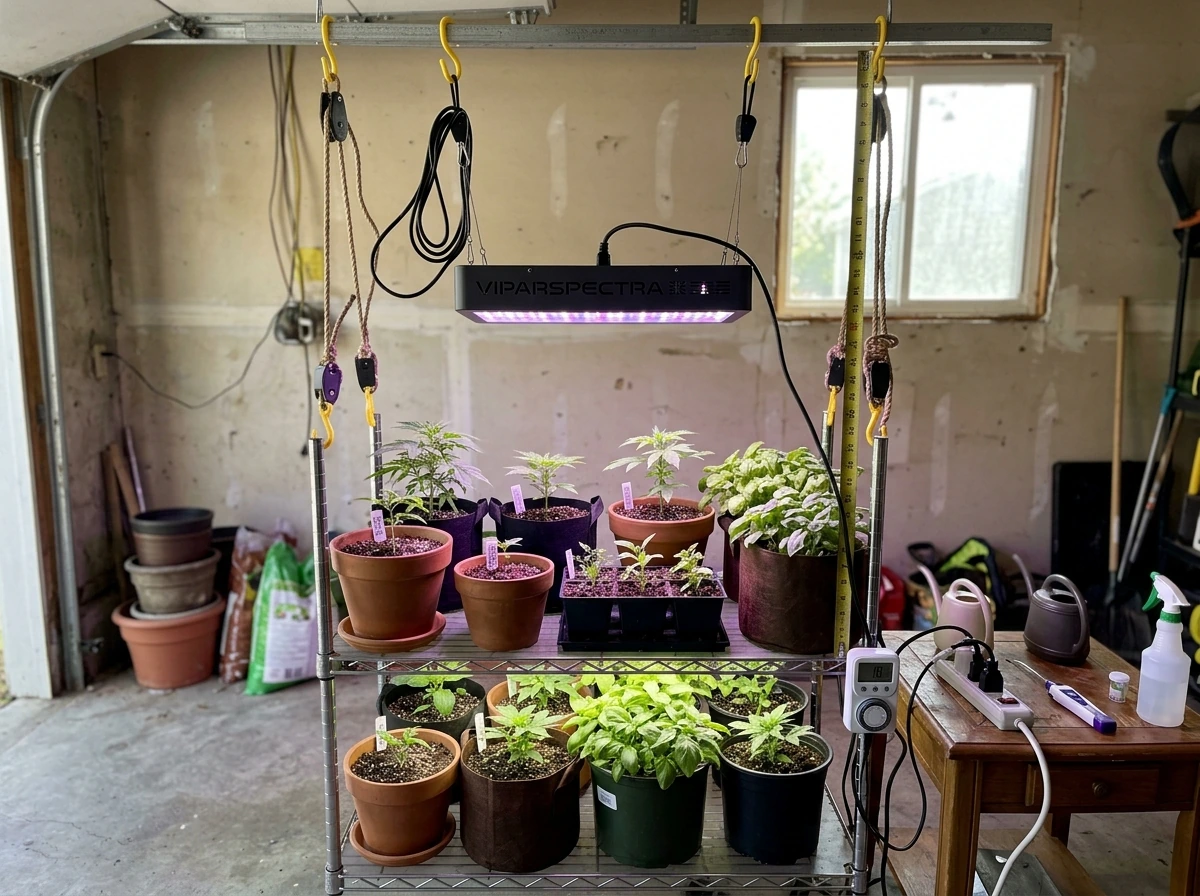
Most home grow lights come with hanging kits, rope ratchets, or clamp arms. Rope ratchets are hands-down the most practical option because they let you raise and lower the light easily as your plants grow. If your light uses a clamp, make sure the mount is rated for the fixture weight, especially heavier LED panels.
Horizontal placement matters as much as height. Center the light over your plant canopy and make sure the coverage area matches your grow space. A light rated for a 2x2 foot footprint will not deliver even light across a 4x4 shelf. If you have a long shelf of seedlings, a T5 strip or a bar-style LED that runs the full length of the shelf will give you much more even coverage than a single round panel.
For wiring and safety: plug your grow light into a grounded outlet. If you are running multiple lights, do not daisy-chain extension cords. Use a proper power strip with surge protection. Keep cords away from water sources and off the floor where they can be tripped over. If your fixture gets warm to the touch on the housing, that is normal for LEDs. If it gets hot enough to be uncomfortable to hold, make sure there is adequate airflow around the unit.
How to use grow light bulbs safely and correctly
Grow light bulbs, meaning screw-in CFL or LED bulbs designed for plant growth, are popular because they fit standard lamp fixtures you may already own. They work well for small setups, single plants, or supplementing a low-light corner. The key is using the right fixture. A standard desk lamp with a reflective shade pointing down toward the plant is a perfectly functional setup for a single houseplant.
A few safety rules that always apply. Never use a bulb in a fixture that is rated for lower wattage than the bulb requires. Check the fixture label for its maximum wattage and stay under it. Do not enclose a grow bulb in a sealed fixture because trapped heat shortens bulb life and can be a fire hazard. Keep bulbs away from water and make sure reflectors or clamp shades are stable and cannot fall onto plants or soil.
When using multiple bulbs across a shelf, space them evenly so you avoid hot spots directly under each bulb and dim zones in between. A good rule of thumb is one 23-watt CFL bulb per square foot for seedlings. For houseplants that need moderate light, one bulb per two square feet is usually sufficient.
Lighting schedules: timing, duration, and turning lights on and off
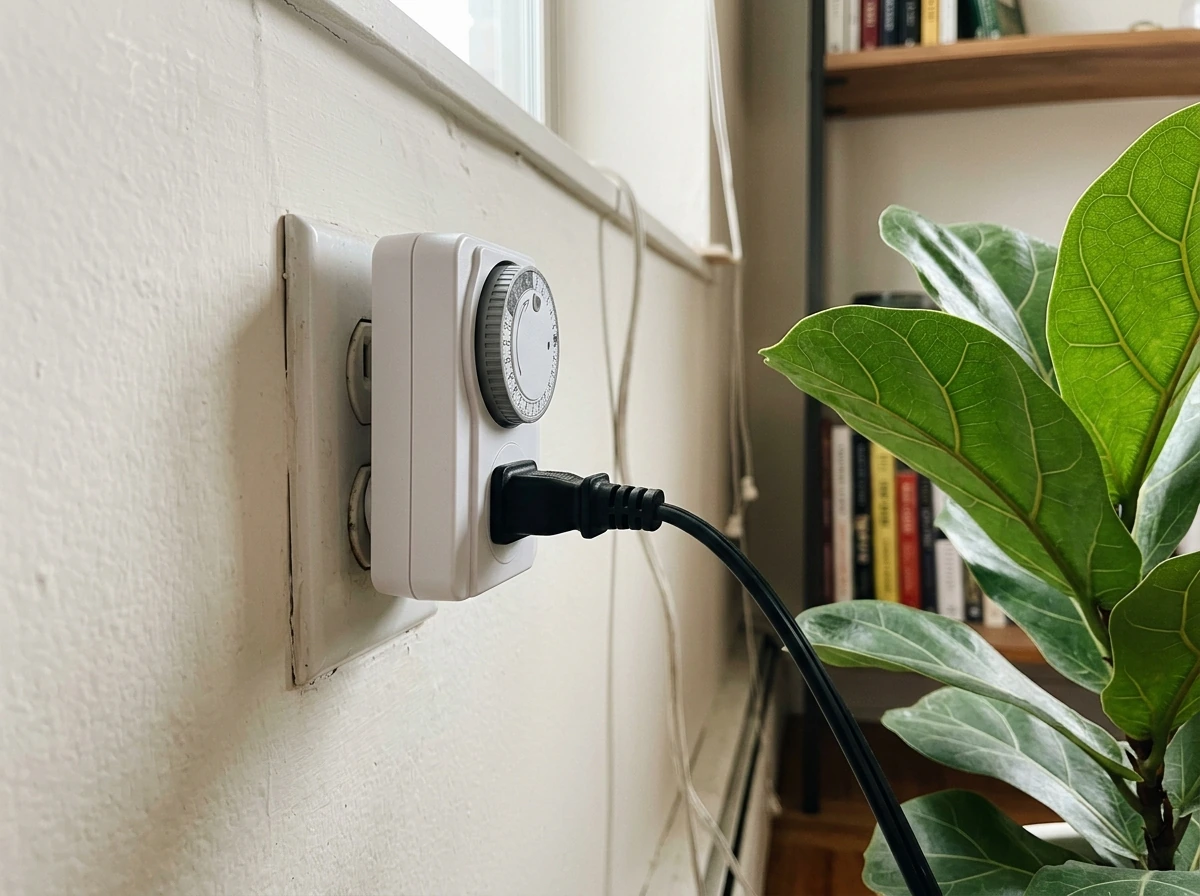
A timer is not optional. It is one of the most important pieces of equipment in your setup. Plants need consistent light and dark cycles, and trying to remember to flip a switch at the same time every day always fails eventually. A basic mechanical outlet timer costs a few dollars and does the job perfectly.
The concept behind scheduling is something called Daily Light Integral, or DLI. DLI represents the total amount of light your plant receives over a full day, calculated as: DLI = PPFD × hours × 0.0036. So a light delivering 150 μmol·m⁻²·s⁻¹ for 16 hours gives a DLI of about 8.6 mol·m⁻²·day⁻¹, which is well within the seedling range. You do not need to calculate this every time, but understanding it helps you make sense of the schedules below.
| Plant Type | Recommended Hours Per Day | Notes |
|---|---|---|
| Seedlings and microgreens | 14 to 18 hours | More hours compensate for lower-intensity bulbs |
| Leafy greens and herbs | 14 to 16 hours | Consistent schedule keeps growth steady |
| Houseplants (low to medium light) | 10 to 14 hours | Match to the plant's natural habitat light level |
| Fruiting plants and flowering crops | 12 to 16 hours | Some plants need a 12-hour dark period to trigger flowering |
| Cacti and succulents | 12 to 14 hours | Too many hours can cause etiolation despite high light needs |
Set your timer to run during the day, ideally overlapping with whatever natural light the room gets. Starting the light cycle early in the morning (say 6 a.m. to 10 p.m. for a 16-hour day) keeps your grow schedule aligned with a normal household routine and makes it easier to check on plants. Avoid running lights through the night if you are in the same room, because the sleep disruption is real.
Dialing in intensity and distance (placement for seedlings vs houseplants)
Distance is your primary tool for controlling how much light your plants actually receive. The closer the light, the higher the intensity. Move it further away and intensity drops quickly. This is why adjustable hanging systems matter so much.
Seedlings are delicate and do not need blinding light. Start them at 4 to 6 inches below a T5 fluorescent or 12 to 18 inches below a mid-power LED panel. Your target PPFD for seedlings is 100 to 150 μmol·m⁻²·s⁻¹. As seedlings develop true leaves and move into the vegetative stage, you can gradually increase intensity by lowering the light or stepping up to a higher-output fixture, targeting 200 to 400 μmol·m⁻²·s⁻¹ for most crops.
For houseplants, starting distance depends heavily on the light's power. A 10-watt LED bulb in a clamp lamp can safely sit 6 to 8 inches from foliage. A 45-watt LED panel should start at 18 to 24 inches and be adjusted from there. High-power LED fixtures (100 watts and above) often need to be 24 to 36 inches away even for mature plants.
If your light does not have a PPFD readout or spec sheet, the hand test is a rough guide. Hold your hand at plant canopy level directly under the light. After 30 seconds, you should feel gentle warmth but no real heat. If it feels like direct summer sun, the light is too close or too powerful for most houseplants. If you feel nothing at all, it may be too far away or underpowered.
Dimmable lights make intensity control much easier. If your light has a dimmer, start seedlings at <anchor>50 to 60 percent power</anchor> and ramp up gradually over two to three weeks. For houseplants that have been in low light conditions, always introduce grow light exposure gradually to avoid shocking the plant.
Common mistakes and troubleshooting
Plants stretching toward the light
Stretching (also called etiolation) means your plants are not getting enough light. Stems grow long and weak as the plant reaches for more. The fix is simple: lower the light, increase the photoperiod by an hour or two, or upgrade to a higher-output fixture. Seedlings are especially prone to stretching under underpowered bulbs, which is one of the most common beginner mistakes. If your seedlings look leggy after a week, move the light closer before assuming anything else is wrong.
Leaf burn and bleaching
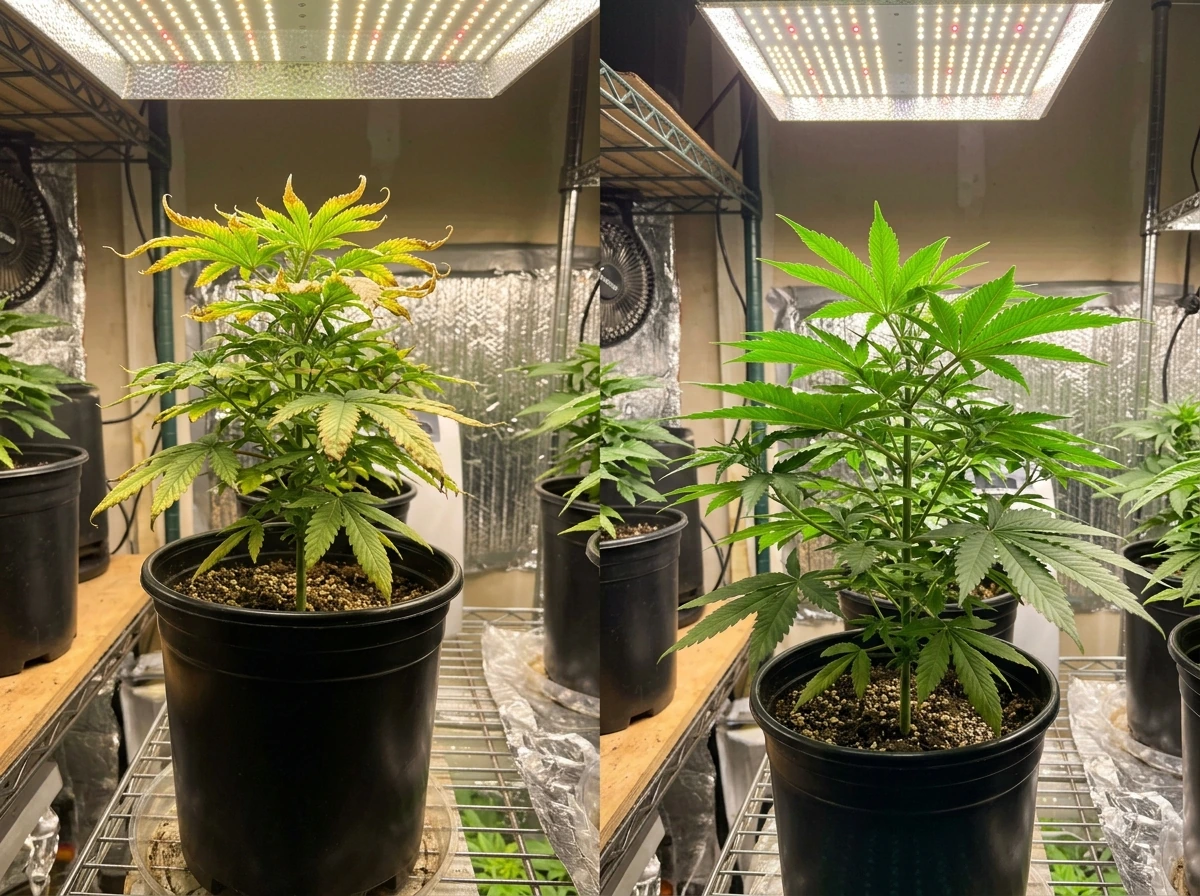
Burned or bleached leaf tips, usually appearing on the growth closest to the light, mean the plant is getting too much intensity. Raise the light, reduce the photoperiod by two hours, or dial the dimmer down. With LEDs, light burn does not always involve heat, so do not assume a cool-running light cannot burn plants. If leaf tips are yellowing or turning white on the tops of leaves nearest the fixture, that is your signal to back off.
Slow or weak growth despite the light being on
Slow growth under a grow light is usually caused by one of three things: insufficient light hours, light that is too far away, or a light that simply is not powerful enough for the plant. Check your timer to confirm it is actually running the correct hours. Measure the distance from the fixture to the canopy and compare it to the manufacturer's recommended range. If both look right, you may need a more powerful light. A 9-watt LED bulb is genuinely not enough for a pepper plant, no matter how close you put it.
Uneven growth across the canopy
If plants directly under the light thrive while those on the edges struggle, the coverage area of your light is too small for the space, or the light is mounted too high. Lower the light or add a second fixture to cover the edges. Reflective material on the walls of an enclosed growing space, like white paint or reflective mylar, can also help bounce light back into the edges and significantly improve coverage without adding a second light.
Quick troubleshooting reference
| Symptom | Likely Cause | Fix |
|---|---|---|
| Long, weak, leggy stems | Not enough light intensity or duration | Lower the light or add 2 hours to the photoperiod |
| Burned or bleached leaf tips near light | Too much intensity | Raise the light 4 to 6 inches or reduce dimmer setting |
| Yellowing lower leaves (not tips) | Could be overwatering, not light-related | Check soil moisture before adjusting light |
| Plants on edges growing slower | Insufficient light coverage | Lower fixture or add a second light |
| No growth despite correct schedule | Underpowered fixture for plant type | Upgrade to higher-output light for that plant's needs |
| Wilting near the light | Heat stress from fixture proximity | Raise light and ensure adequate airflow |
Your next steps to get started today
If you are just getting started, here is the practical path forward. Pick a full-spectrum LED panel or T5 fixture sized for your growing area. Hang it on rope ratchets at the distance recommended for your plant type: 12 to 18 inches for seedlings under most LED panels, or 4 to 6 inches under T5 tubes. Plug it into a mechanical outlet timer and set it for 16 hours on, 8 hours off for seedlings, or 14 hours on for houseplants. Check your plants after three to five days. If they are stretching, lower the light. If tips are burning, raise it. That adjustment loop is really all you need to dial it in. best grow light schedule 1
Once you have the basics running smoothly, you can get more precise. For seedlings specifically, the setup nuances go deeper and are worth exploring further. If you are focused on houseplants, the light requirements vary quite a bit by species. And if you want to understand how spectrum colors like red and blue light affect your plants differently, that knowledge can help you get even better results from the equipment you already own.
FAQ
Can I make up for weak light by running the grow light longer?
Yes, but only if the light you choose can produce enough PPFD at the canopy level. If your PPFD target is, for example, 150 to 200 μmol·m⁻²·s⁻¹ and you cannot reach it at the distance you have available, extending hours will not fully compensate. The safer approach is to keep the photoperiod in a reasonable range and increase intensity (closer or higher-output fixture) to meet your PPFD range.
Is it better to use one long light period or split it into multiple sessions?
Not for most plants. Most setups benefit from a consistent daily on period, then a full off period for dark respiration. If you split the light, keep each segment from becoming too short to be useful, and make sure the total DLI stays in the correct ballpark for your stage. Also, avoid frequent changes day to day, because plants respond to consistency.
How should I adjust when switching a plant from natural light to grow light?
Treat the start-up period as an adjustment. Even if you are using the correct distance and timer, start seedlings at the lower end of the intensity range (or a dimmer setting if available) for the first week, then adjust upward only after you see no signs of stretching or leaf-tip bleaching.
What if my grow light doesn’t list PPFD, can I still use the DLI idea?
DLI calculations are only as accurate as your PPFD. If you do not have PPFD numbers from the fixture, rely on distance and the manufacturer’s recommended starting height, then use plant feedback (stretching means too low intensity, bleached tips means too high). For tuning without PPFD, the timer still matters most for consistency.
What should I check before plugging a grow light into a timer?
Use the timer’s rating for the fixture’s power draw, not just the wattage label on the bulb or panel. Also confirm the timer is intended for continuous daily operation, because cheap timers can fail faster with high load cycles. If you are unsure, use the manufacturer’s guidance for compatible timers or plug the light into a heavy-duty power strip that can handle the load.
If an LED light feels cool, can it still burn plants?
Do not rely on LED fixture warmth as a safety indicator for plant health. LEDs can burn plants even when they feel cool to the touch. Heat that indicates a problem is uncomfortable to hold or causes the fixture surface to be too hot, but plant damage is more often about intensity and distance. Adjust based on symptoms, and measure distance from the light to the canopy.
How do I fix uneven growth when plants under the center look healthy?
Yes, and it can show up even when the center looks fine. If the center thrives but edges pale out, you likely need more coverage (larger footprint fixture, lower mounting height, or multiple fixtures). Adding reflective material can help, but for wide shelves the most reliable fix is adding a second light or switching to a bar-style fixture that matches your space.
What is the best way to adjust the light when the first week looks wrong?
Make adjustments gradually. If plants show stretching, lower the light in small increments or add intensity over several days, especially for houseplants that were previously low light. If you see burning or bleached tips, raise the light and consider reducing photoperiod by a modest amount for a few days, then resume dialing back toward your target.
How often should I re-adjust the height of my grow light?
For seedlings, the fixture height changes rapidly as they grow, so re-check distance at least weekly (or more often for fast-growing microgreens). For houseplants, check when new growth noticeably changes height. Also confirm your rope ratchets or clamps do not slip, because even small height drift changes PPFD a lot.
If my grow light is dimmable, how should I ramp it up without stressing the plant?
Yes, but introduce dimmer changes slowly to avoid a sudden intensity shock. If you have a dimmable fixture, ramp over 2 to 3 weeks, and increase one variable at a time when troubleshooting. For example, when raising intensity, keep the timer hours steady so you can tell which change caused the plant response.
Can I use a regular desk lamp instead of a grow light?
A desk lamp can work as a supplement for one plant, but it is rarely ideal as a primary light for larger areas because coverage is small and intensity is harder to control. Use it only if you can position it close safely and keep the plant from getting overly hot. If multiple plants are involved, prefer a panel or bar that matches the growing footprint.
What are the most common fixture mistakes with CFL or LED grow bulbs?
Most bulbs should not be used in enclosed fixtures not meant for plant bulbs, because trapped heat can shorten bulb life and create safety risks. Also avoid exceeding the fixture’s maximum wattage rating. If you are using clamp lamps, verify the clamp is rated for the bulb and fixture weight, and ensure the shade cannot fall.
My plants grow slowly, how do I troubleshoot the cause quickly?
It often happens when your plants are receiving light too far from the canopy. First verify the timer is actually switching on for the intended hours, then measure distance from fixture to plant and compare it to the starting range for your fixture type. If the timer and distance are correct, the light is likely underpowered for that crop, so you need a higher-output fixture or more total watts across the space.
Is it okay to run the grow light at night while I sleep?
If you are in a room where people sleep, it is usually better to run the light during daytime hours, overlapping any natural light you get. Running through the night can disrupt sleep even if plants are fine. If you need night operation, consider moving the plants to a separate room or using blackout curtains to reduce stray light exposure.
Next Article
Best Grow Light Schedule 1 for LEDs: Timing and Placement
Set the best grow light schedule 1 for LED plants with timing, placement height, and tuning for seedlings or veg.