If you have an AC Infinity IONGrid or a similar controller with a 'Schedule 1' mode, here is what that actually means and exactly how to use it: Schedule 1 is simply a programmable daily on/off timer. You set a clock time for the light to turn on, a clock time for it to turn off, and the controller repeats that cycle every single day. That is it. No mystery, no complicated algorithm. The confusion usually comes from the label itself, which sounds more technical than it is.
Best Grow Light Schedule 1 for LEDs: Timing and Placement
Marcus Tillman
24 Mar 2026
What 'grow light schedule 1' actually means
On controllers like the AC Infinity IONGrid, Schedule 1 and Schedule 2 are two independent daily on/off programs you can store separately. The manual describes them as modes that 'set an on clock time and an off clock time schedule for the grow light to follow daily.' Schedule 1 is typically the primary schedule most growers use for their main photoperiod, while Schedule 2 can be set up as an alternate program (say, for a different season or a second grow tent). Most home growers only ever need Schedule 1.
One feature worth knowing about: the IONGrid and many other modern controllers include a 'transition level' setting. Instead of the light snapping on at full power and cutting off instantly, it gradually ramps brightness up at the start and dims back down at the end of the scheduled window. Mars Hydro's iControl does the same thing, brightening from 10% to maximum before the scheduled start time, then dimming back down after the end time. Gavita and Fluence call this 'sunrise/sunset simulation.' It is gentler on plants and mimics natural daylight cycles, so if your controller has this option, turn it on.
As for when to use Schedule 1: it works for every growth stage. The schedule itself does not change, but the number of hours you program into it does depending on what you are growing. Seedlings typically get more hours than mature flowering plants. Here is the breakdown by stage.
How many hours to run the light, and when to run it
The number of daily light hours is the most important number you will program into Schedule 1. It directly controls your plant's total daily photon dose, which horticulture researchers call the Daily Light Integral (DLI). DLI is the accumulated amount of light a plant receives over an entire day. Think of it like a rain gauge but for photons. More hours at the same light intensity equals a higher DLI, which generally means faster growth, up to the point where plants get too much and show stress.
| Growth Stage | Recommended Daily Hours | Typical On/Off Example | Notes |
|---|---|---|---|
| Seedlings (germination to 2 weeks) | 16–18 hours | 6:00 AM on, 10:00 PM off | Seedlings have no mature root system yet; consistent light drives early development |
| Vegetative growth | 16–18 hours | 6:00 AM on, 10:00 PM off | Most common schedule; supports strong stem and leaf growth |
| Pre-flower transition | 14 hours | 7:00 AM on, 9:00 PM off | Gradually reduce hours to signal season change if needed |
| Flowering / fruiting plants | 12 hours | 7:00 AM on, 7:00 PM off | Short-day trigger for many flowering species |
| Houseplants (low-light species) | 10–12 hours | 8:00 AM on, 8:00 PM off | Most foliage houseplants do not need as much as vegetables or seedlings |
For most home growers using Schedule 1 for the first time, a 16-hour on / 8-hour off cycle is the safest starting point. It works well for seedlings, herbs, leafy greens, and vegetative growth. The 8 hours of darkness matter just as much as the light hours. Plants use the dark period for respiration and repair. Do not try to run lights 24 hours thinking more is better, because it is not.
For the specific on/off times: align the schedule with your own routine so you can actually observe your plants during lit hours. A 6:00 AM on, 10:00 PM off schedule works well for most people because it matches a normal waking day. If you sleep in, push it to 7:00 AM on, 11:00 PM off. The plants do not care about clock time; they care about consistency. Once you set Schedule 1, do not keep changing the times. Pick a window and stick to it.
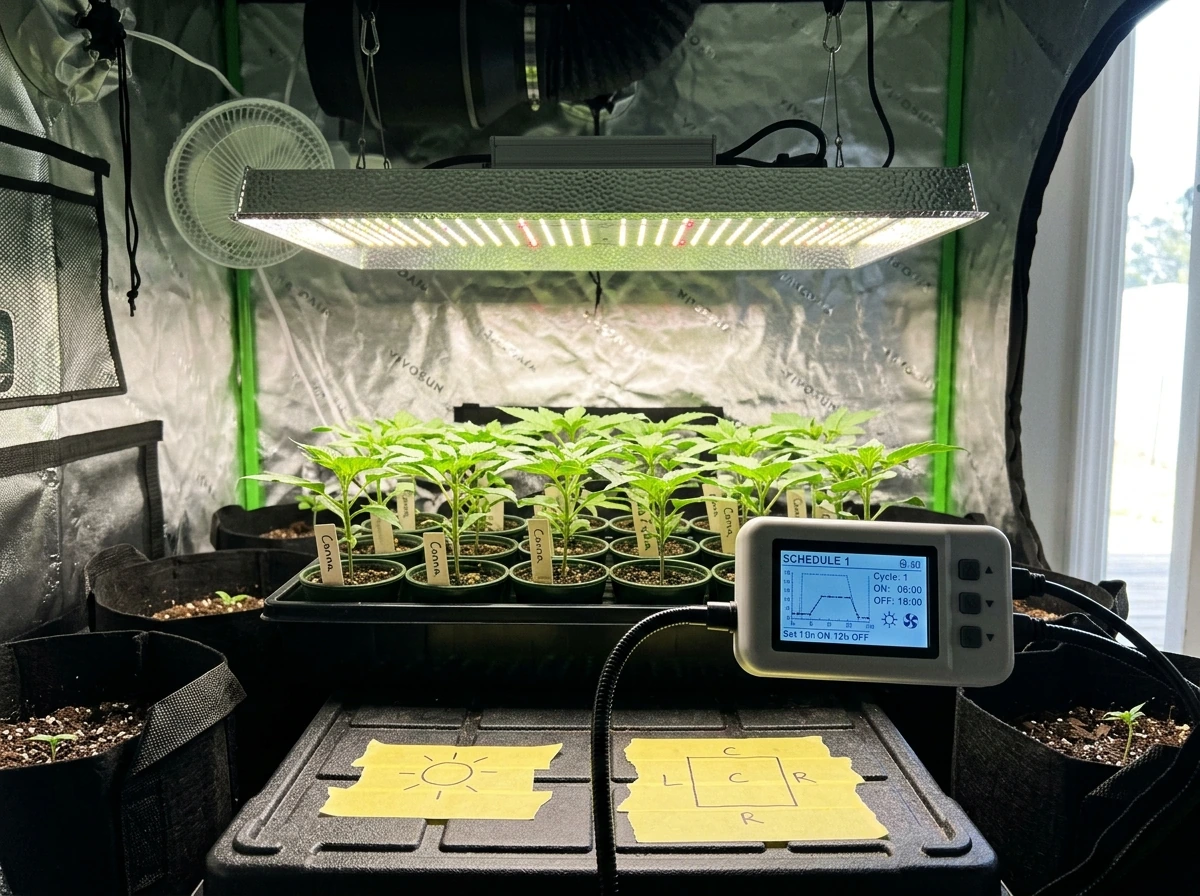
Setting up Schedule 1 on your controller or timer
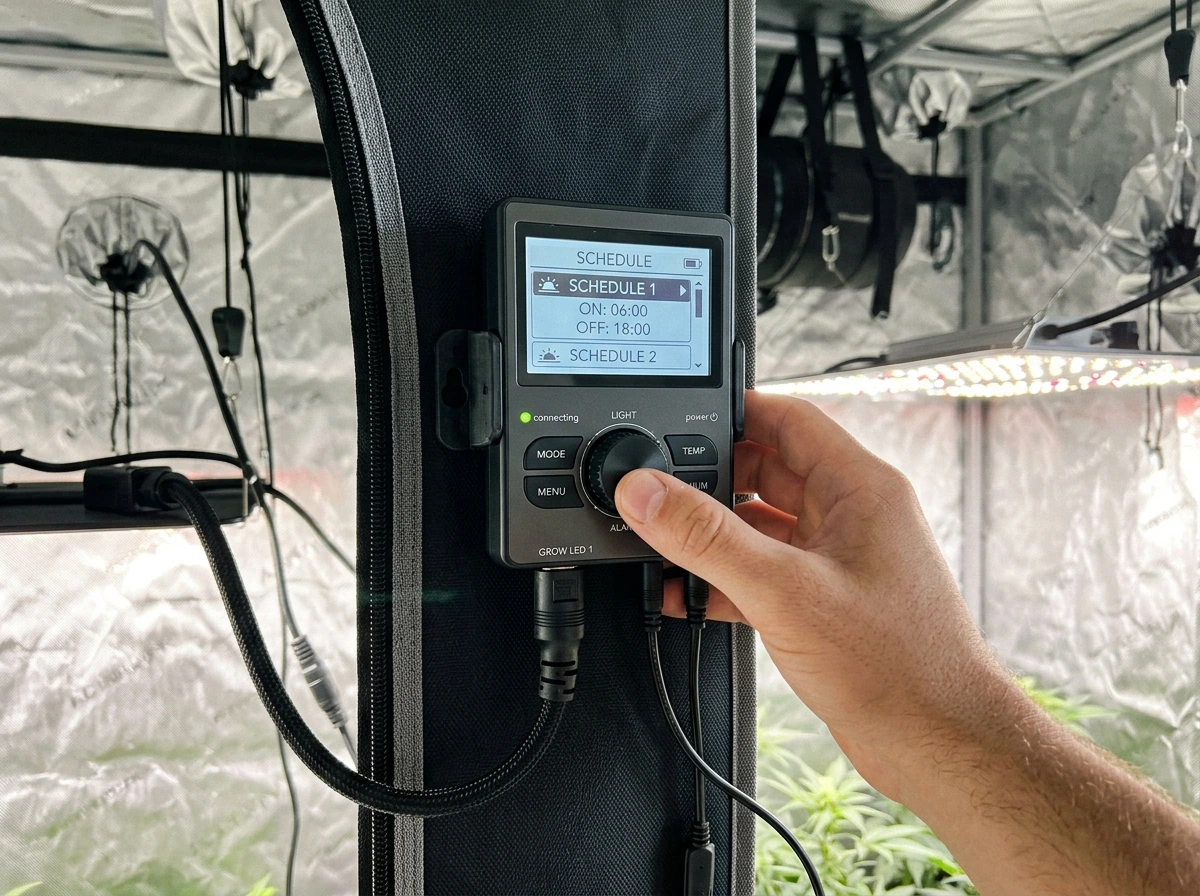
The exact steps depend on your controller, but the process is nearly identical across AC Infinity, Mars Hydro, Gavita, and basic plug-in mechanical timers. Here is the general flow for digital controllers.
- Power on the controller and navigate to the MODE or SCHEDULE section in the menu.
- Select SCHEDULE 1 (or SCHEDULE MODE 1) from the available modes.
- Enter your ON time: for example, 06:00 AM.
- Enter your OFF time: for example, 10:00 PM.
- If your controller has a transition or ramp setting, set it to 15–30 minutes for a gradual sunrise/sunset effect.
- Confirm or save the settings, then verify the controller clock is set to the correct current time. A wrong clock time means wrong on/off cycles.
- If you are using a plug-in mechanical timer instead of a built-in controller, plug the timer into the outlet, plug the grow light into the timer, set the current time on the dial, then push down the ON pins for every 30-minute segment that falls within your target light window.
One thing that catches people off guard with the AC Infinity IONGrid specifically: if your transition (ramp) period is set long enough that it would extend past your programmed off time, the controller stops the dimming at the end of the timer window rather than continuing past it. So if you set a 30-minute sunset transition and your off time is 10:00 PM, the dimming will stop at 10:00 PM regardless of where it is in the ramp. Keep transitions short relative to your window length and this will never be an issue.
If you are running a basic plug-in timer with no fancy controller, that is completely fine. A mechanical outlet timer set to 16 hours on and 8 hours off at a consistent intensity is all most seedling and vegetative setups need. You can always add a smarter controller later. Do not let gear complexity stop you from starting.
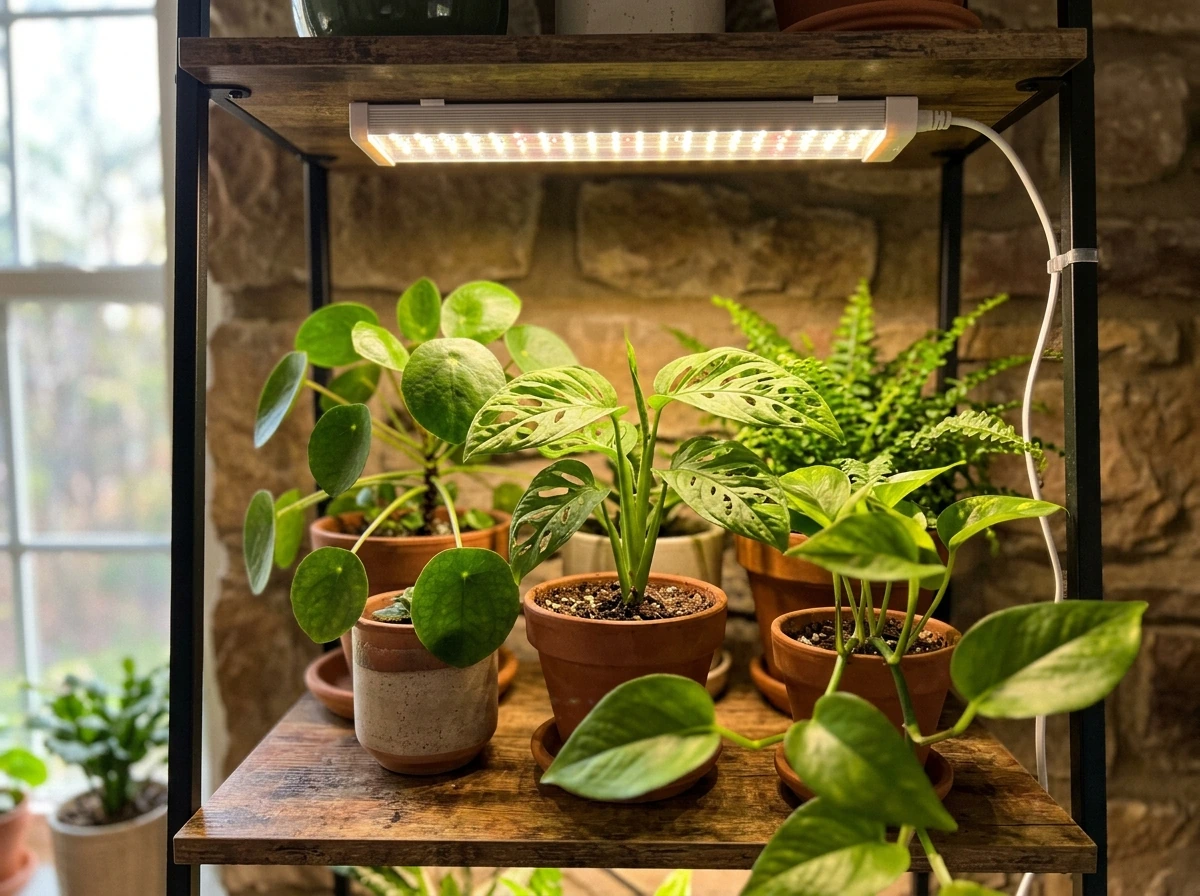
How to place your LED grow light for best results
Schedule 1 controls timing, but placement controls intensity. Both have to be right. An LED grow light at the wrong height will either burn your plants or leave them so starved for light that they stretch toward the fixture. Getting this dialed in is just as important as the schedule itself.
Height and distance from the canopy
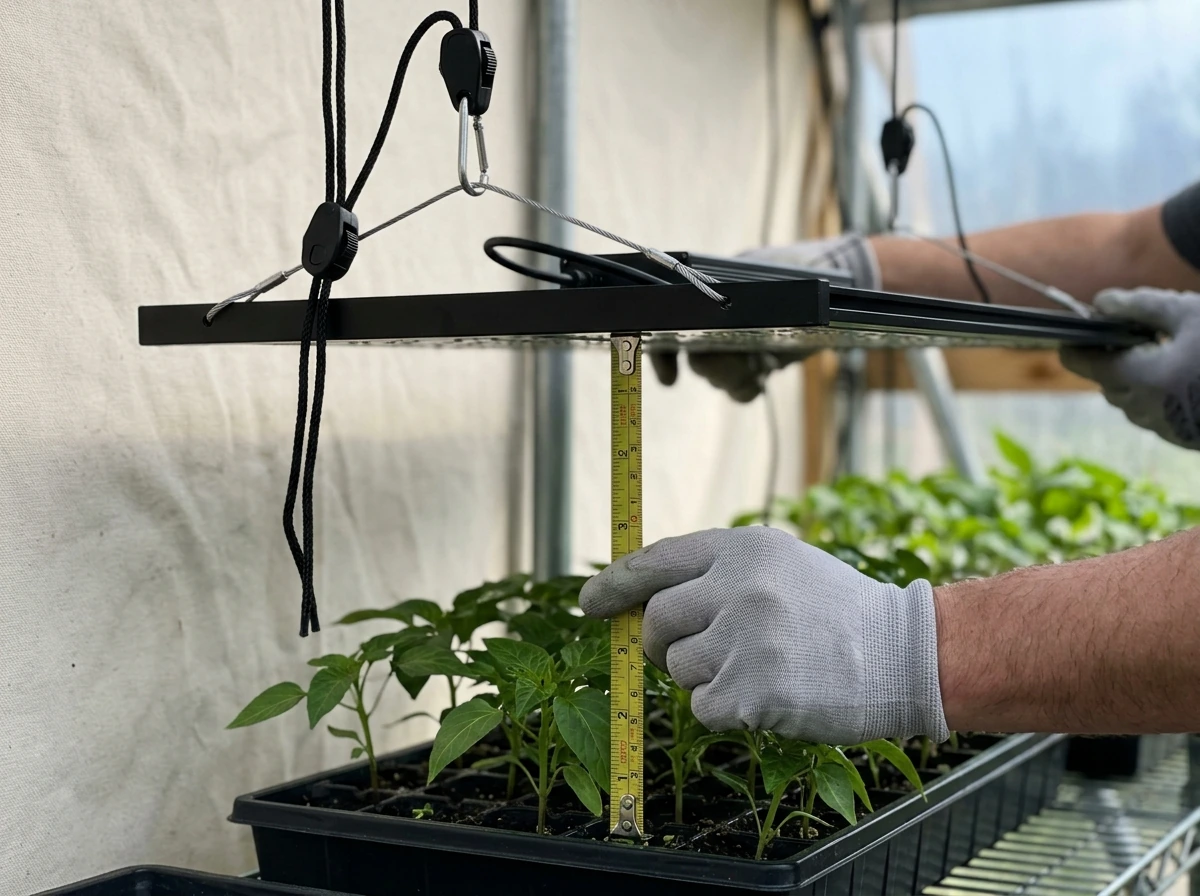
Start with the manufacturer's recommended hanging height, which for most mid-range LED panels (150W to 300W equivalent) falls between 18 and 24 inches above the plant canopy for vegetative growth. For seedlings, which are more delicate, keep the light at the higher end of that range, around 24 inches, and only bring it closer if you see the plants stretching upward trying to reach the light. A general rule for seedling stages is to keep the light 4 to 6 inches above very young sprouts if you are using a low-intensity T5 or small LED bar, but 18 to 24 inches for full-panel LEDs.
As a basic coverage reference, a single 2-foot grow light covers approximately a 2-foot by 2-foot area at proper intensity. If you are trying to cover a 4-foot by 4-foot tent with a single bar light, your plants at the edges will not get enough light no matter how long you run Schedule 1. Match coverage area to the number of fixtures before worrying about timing.
Angle and even coverage
Most LED panels are designed to hang flat and horizontal directly above the canopy. Do not tilt them at sharp angles trying to cover more area because that reduces intensity at the canopy level and creates uneven light distribution. If you have plants at different heights, raise the shorter ones on platforms or small risers rather than angling the light. Even canopy height gives you even light coverage, which is the goal.
Check for hotspots by placing your hand at canopy level and moving it slowly across the grow area. If one spot feels noticeably warmer than others, your light is not distributing evenly or it is too close. Rotate your plant pots a quarter turn every two to three days if you cannot achieve perfectly even coverage with your current setup.
Reading your plants and adjusting Schedule 1
Your plants will tell you whether your schedule and placement are right. You just have to know what to look for. This is the part most guides skip over, and it is where new growers lose confidence because they do not realize they are supposed to keep adjusting.
Signs of too little light (increase hours or lower the fixture)
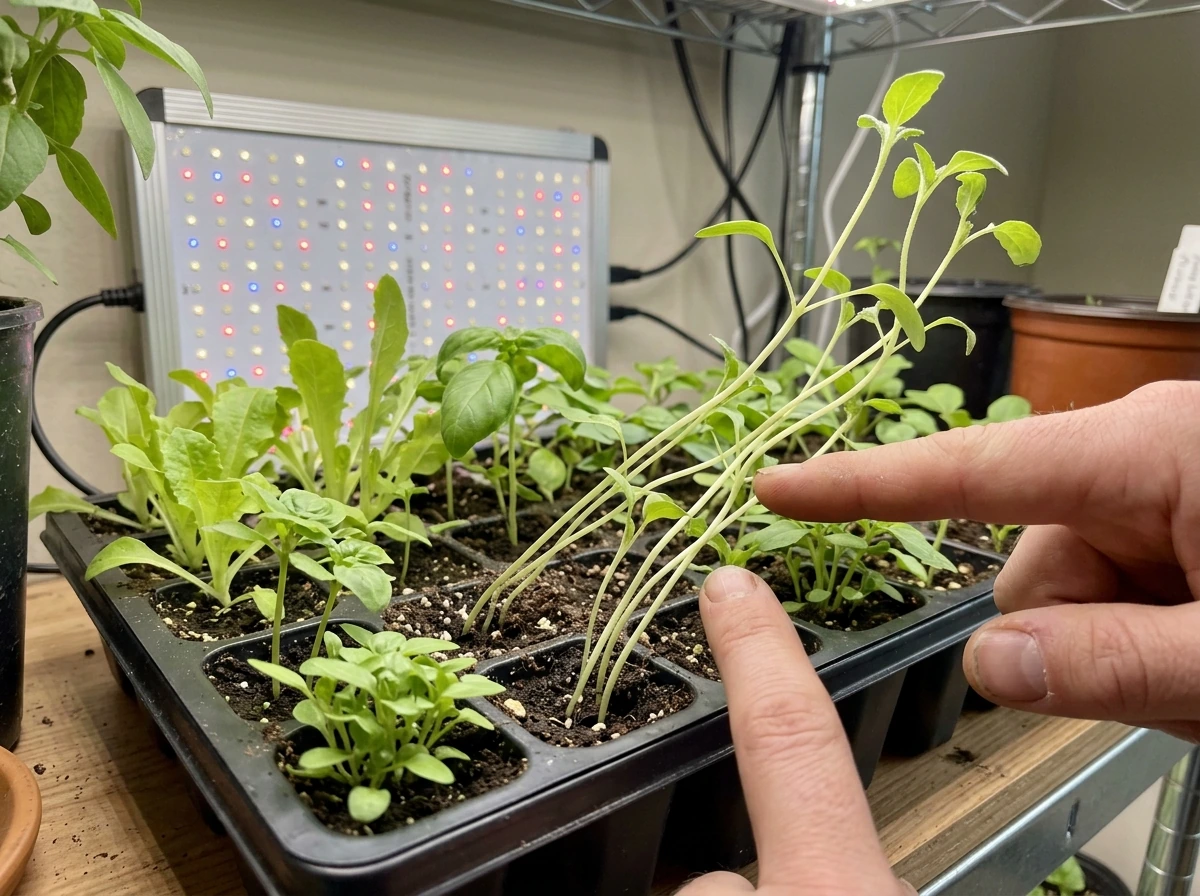
- Stretching (also called legginess): stems grow long and thin, leaves are spaced far apart on the stem, and the plant leans toward the light source. This is the most common sign that either the schedule hours are too short or the light is too far away.
- Pale or yellowing leaves despite healthy watering and feeding: the plant cannot photosynthesize enough to produce chlorophyll at a normal rate.
- Slow growth rate compared to what you expect for the plant's age.
- Small leaf size for the species.
If you see stretching, first move the light 2 to 4 inches closer to the canopy before changing the schedule. If the stretching continues after a week, add one to two hours to your Schedule 1 on time. Adjust one variable at a time so you know what actually fixed the problem.
Signs of too much light (reduce hours or raise the fixture)
- Leaf edges turning brown or crispy, especially the tips closest to the light.
- Leaves cupping upward or downward as a stress response.
- Bleaching or whitening of leaves at the top of the canopy directly under the light.
- Wilting even when the soil moisture is fine.
- Heat stress: if the grow space feels very warm and the leaves look droopy or scorched, the light may be too close or running too many hours.
If you see any of these, raise the light by 3 to 4 inches first and observe for three to five days. If that resolves the problem, you are done. If not, try reducing your Schedule 1 on time by one to two hours. LEDs produce significantly less heat than HPS or fluorescent lights, but they can still cause heat stress at very close distances, especially in small enclosed spaces with poor airflow.
Common mistakes that will wreck your results
Most of the problems growers run into with grow light schedules are completely preventable. Here are the ones that come up over and over.
Inconsistent or constantly changing schedules
Plants adapt to a consistent photoperiod. If you keep adjusting the on/off times in Schedule 1 every few days, you are confusing the plant's internal clock and preventing it from settling into a stable growth rhythm. Set the schedule, give it at least one to two weeks before evaluating results, and then make one small adjustment if needed. Patience here is not optional.
Running lights too close for too many hours
A common beginner move is to put the light as close as possible and run it for 18 or more hours, thinking that maximizes results. What it actually does is overheat the canopy and deliver a DLI that is way above what most plants can use. Match your light distance to manufacturer specs and start at 16 hours rather than jumping to 18 or 20.
Uneven light coverage across the grow area
If you have a 4-foot by 4-foot grow space and one LED panel, some plants will always get more light than others. No schedule setting fixes uneven hardware coverage. Add a second light, use reflective walls or mylar, or reduce the grow area to match what your light can actually cover evenly. Philips and other commercial lighting manufacturers specifically evaluate LED grow lights for PPFD uniformity (how evenly photons are distributed across the canopy), and it matters for home growers too.
Forgetting to verify the controller clock
This one sounds obvious but it catches people constantly. If your controller's internal clock is wrong (say, it is 3 hours off because you set it up during daylight saving time and forgot to update it), your Schedule 1 runs at the wrong times. Check the clock on your controller when you first program it and any time you notice the lights behaving unexpectedly.
Ignoring failed diodes on LED fixtures
Individual LED diodes on a panel can fail over time, creating dark spots in your coverage area. If one section of your canopy is growing noticeably slower than the rest despite an identical schedule, check the fixture by looking directly at it (briefly) when it is at low intensity, or check it when it is off by examining the diode grid. A fixture with multiple dead diodes needs to be replaced because no schedule adjustment compensates for a physically broken light.
Your practical starting point, right now
If you are setting up Schedule 1 today for the first time, here is the short version of everything above. Set your on time to 6:00 AM and your off time to 10:00 PM (16 hours on, 8 hours off). Hang your LED panel at 18 to 24 inches above the canopy. Enable the sunrise/sunset transition feature if your controller has it. Wait one full week before making any changes. Then look at your plants: if they are stretching, move the light closer by 2 to 4 inches. If leaves are curling or scorching, raise it. Adjust hours only after you have ruled out placement as the cause. Keep a simple log of what you changed and when, even just in a notes app, because it is almost impossible to troubleshoot without a record of what you actually did.
If you want to go deeper on placement for specific plant types or learn how to match light intensity to your plant's stage, the guides on how to use a grow light for houseplants and for seedlings specifically cover those details. For Schedule 1 setup, what you have here is everything you need to get started and get real results. how to use full spectrum grow lights
FAQ
Does enabling the sunrise/sunset transition change my “hours on” for Schedule 1?
No. A sunrise or sunset ramp only smooths brightness changes within the same scheduled window. If you extend the ramp so it overlaps the lights-off time, some controllers will stop ramping at off time, so your real daily light hours remain defined by the on/off clock, not the ramp length.
If I am using Schedule 1 for the first time, how do I know whether I picked too many or too few hours?
Run lights long enough to hit your target daily light integral, then stop adjusting. If you are unsure, start with 16 hours on for veg and fine-tune by watching stretching and leaf signs after at least one week. Switching between drastically different hour counts every few days usually causes the inconsistent growth you are trying to avoid.
Can I use Schedule 1 together with Schedule 2, like daytime veg then nighttime for something else?
Yes, but only if the controller supports it and you understand the behavior. With multi-step or multiple schedules, Schedule 1 still follows its own daily on/off times, but plants may experience shorter or longer dark periods depending on how you define overlap. If your goal is stable biology, avoid frequent schedule changes and keep one primary schedule.
What if I need to change the on/off times because my routine changes?
Your clock should not be tied to your sleep schedule, it should be tied to consistency and your ability to observe. After setting a time, avoid moving it by more than about 1 hour at a time. If you must shift for travel, try to keep the photoperiod within the same general window for a week rather than making daily jumps.
If my plants are stretching, should I add more hours to Schedule 1 or adjust height first?
A too-low light height can cause the same “fix” instinct as a schedule issue. If you see stretching, first adjust placement by moving the fixture 2 to 4 inches closer, then reassess after about a week before adding hours. Raising hours while the light is too far away often wastes electricity and can still leave parts of the canopy underlit.
If I think my LEDs are “burning” the plants, should I reduce Schedule 1 hours immediately?
If leaves are curling or looking scorched, the likely cause is excessive intensity at the canopy, which is placement and sometimes intensity settings. Raise the light 3 to 4 inches first and observe for 3 to 5 days before reducing schedule hours. This prevents you from underfeeding the plant while the intensity problem is still present.
Can I combine a basic outlet timer with a controller’s Schedule 1?
Yes, you can, but it is usually better to keep the controller in control of the photoperiod and use only one timing device. If you stack a plug-in timer with a controller schedule, you can end up with unpredictable cutoffs that interfere with ramping and create partial dark periods. If you add an external timer, set it to a simple master on/off window and leave Schedule 1 as your internal photoperiod.
How can I tell if my Schedule 1 is set correctly versus the controller clock being wrong?
Check the controller clock first. If the lights are turning on at the wrong times, the most common cause is a setup clock offset (including daylight saving time) or a missed power loss reset. Once the clock is correct, verify the on/off times stored in Schedule 1, not just what you last entered.
If one corner of my grow looks worse, is it a Schedule 1 problem?
No schedule can fix uneven PPFD from coverage gaps. If some plants are consistently lagging while others look normal, treat it as a coverage or fixture failure issue first, then consider reflective material or adding another panel. If the mismatch is extreme in one area of the canopy, inspect the fixture for dead diodes.
When I change Schedule 1, how long should I wait before judging results?
Do not interpret “darker” as “less light needed” if the plant is acclimating. Instead, keep intensity and height consistent, and make only one variable change at a time. Wait at least one week after any change, because plants can take time to reflect the new photoperiod and light dose.
What happens if I accidentally run Schedule 1 at 12 hours on instead of 16?
Yes, but expect slower growth and potentially more stretching if the total light dose becomes too low for the stage. The photoperiod defines daily light hours, so cutting hours without adjusting distance or intensity can reduce DLI. If you must shorten the schedule, compensate by ensuring placement and coverage are correct, then monitor for stretching over a week.
What should I record so I can troubleshoot my Schedule 1 setup later?
Log two things, the exact on time and off time, plus any placement or intensity changes. This matters because schedule, ramp, and height all affect the same visible outcomes. A simple notes app record helps you avoid repeating the same mistake when diagnosing why growth slowed or leaves look stressed.
Next Article
How to Use a Grow Light for Houseplants: When and Setup
Know when and how to use grow lights: choose the right type, set distance and coverage, and run an effective timer.