Building your own grow light is one of the most satisfying projects in indoor gardening, and it's genuinely practical. A well-built DIY LED grow light can outperform many budget off-the-shelf fixtures, cost less over time, and be sized exactly for your space. This guide walks you through every stage: picking the right components, wiring it safely, sizing it correctly for your plants, mounting it, dialing in the schedule, and fixing problems when they come up.
DIY Grow Light Setup: Build a Reliable Best-Result LED System
Marcus Tillman
24 Mar 2026
What You're Actually Building (LED vs Other Types)
The short answer: build with LEDs. Here's why that matters for a DIY project specifically. LED fixtures convert more electrical input into light rather than heat compared to HID sources like metal halide (MH) or high-pressure sodium (HPS). That means less wasted energy, less heat to manage in your grow space, and a longer-running system. Metal halide lamps, for comparison, last around 5,000 hours (roughly nine months at 18 hours a day) before efficiency drops enough to warrant replacement. A quality LED module will run far longer before meaningful degradation.
HPS lights do have a track record in flowering applications and hold their brightness reasonably well over their lifespan, but they generate significant heat that complicates a DIY build. Fluorescent lights (T5/T8) are easy to wire and fine for seedlings, but they lack the intensity and penetration for larger plants or flowering. For a DIY setup that's genuinely useful across plant stages and doesn't require a cooling overhaul, LED is the right call. how to build grow lights
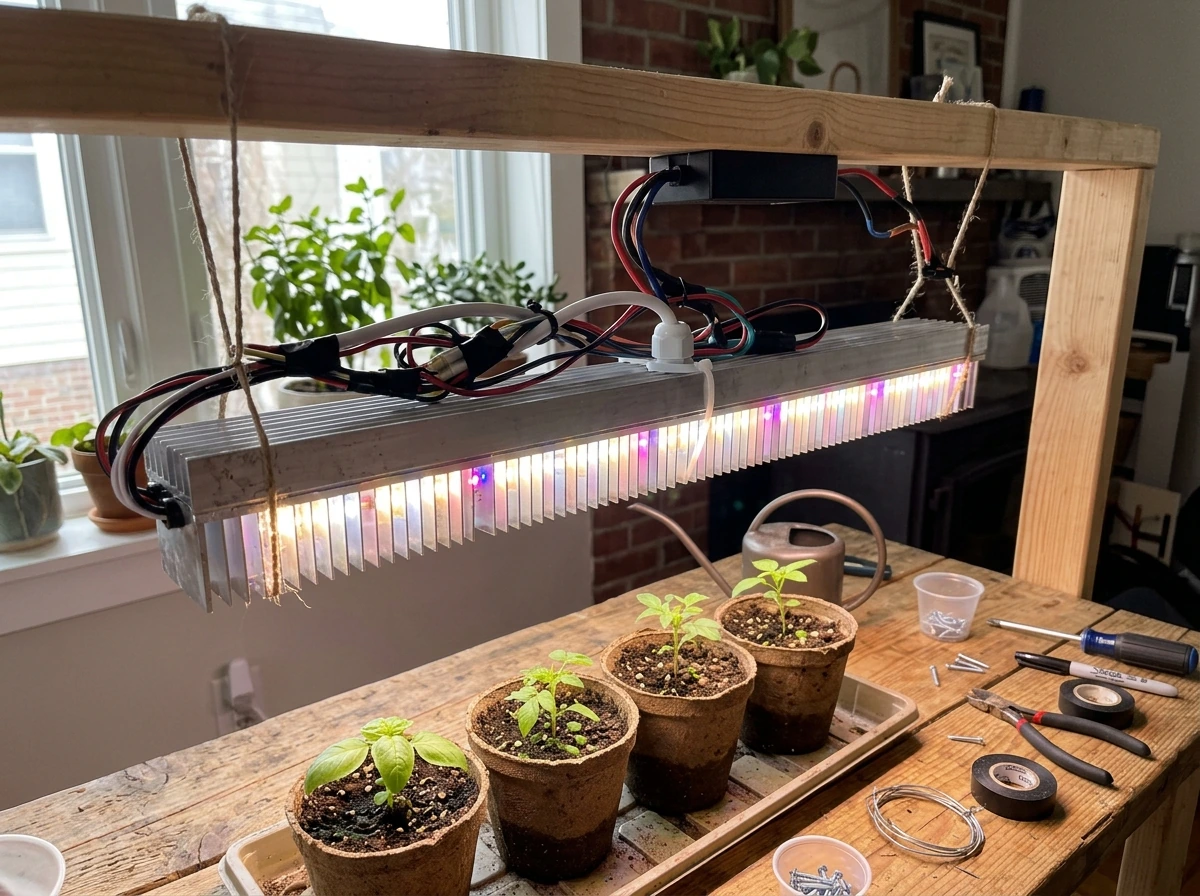
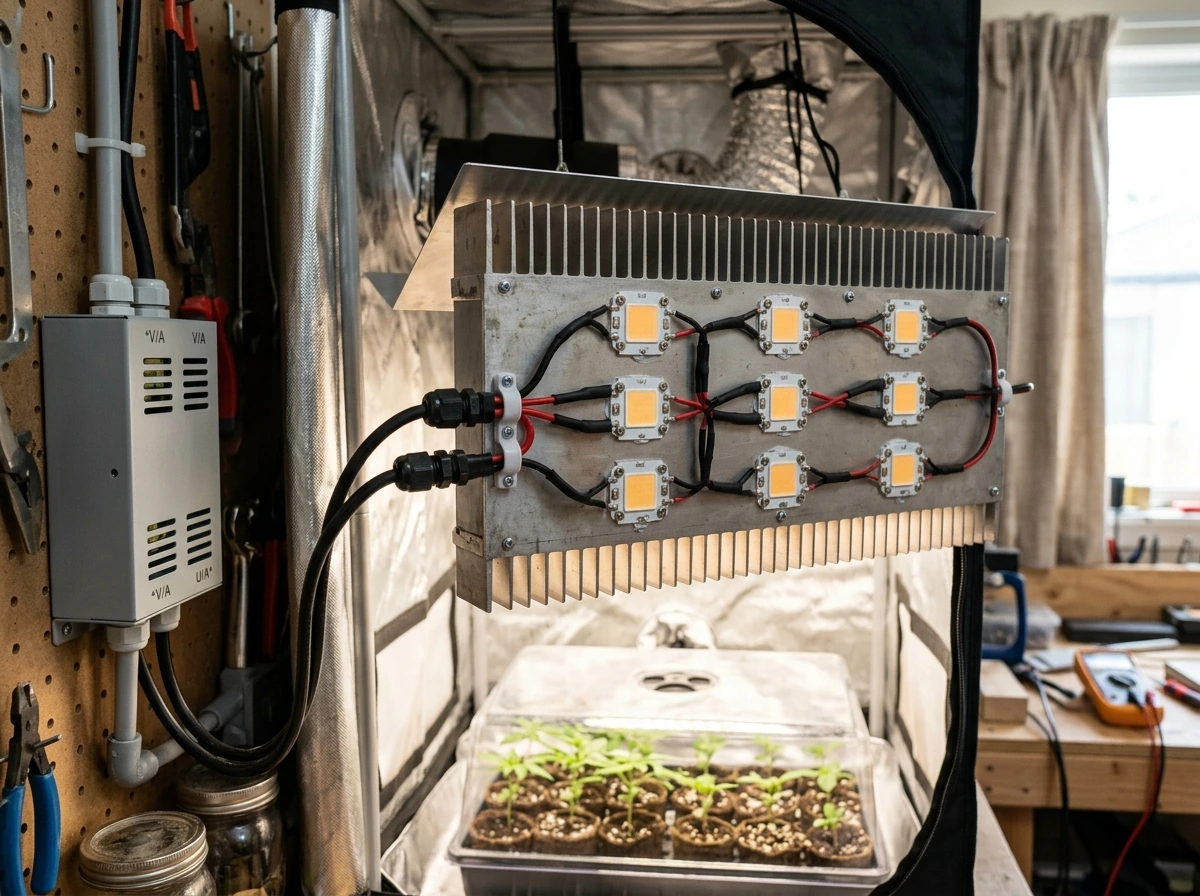
What you're building specifically is a quantum-board-style or COB (chip-on-board) LED panel: a heatsink with LED modules mounted to it, driven by a constant-current LED driver, wired safely, and hung over your plants. It's not complicated, but there are details that matter. If you're interested in going deeper on the structural side, building a grow light stand is a natural next project once your light is ready, so your do it yourself grow lights setup stays secure.
Choosing Your Materials and Components
This is where most people get overwhelmed. Let's break it into the five things you actually need to source: LED boards or COB chips, a driver, a heatsink, thermal interface material, and a mounting/wiring kit. Everything else is optional or secondary.
LED boards or COBs
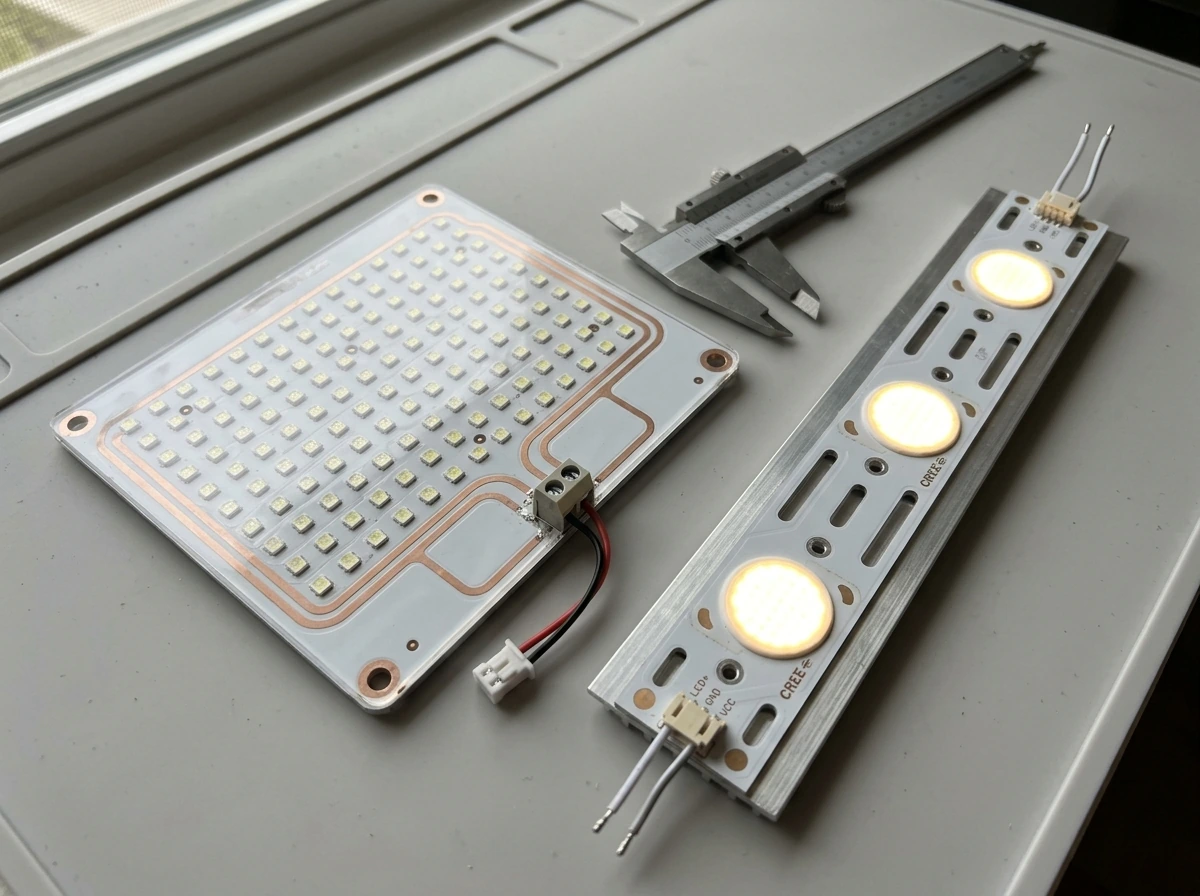
Quantum boards from Samsung (LM301B or LM301H chips) and Bridgelux EB strips are the most popular DIY choices right now for good reason: high efficiency, wide availability, and strong community support. COB arrays from Cree or Citizen are also excellent and produce intense point-source light. For a first build covering a 2x4 ft space, two or four quantum boards paired to a single driver is the most forgiving configuration. A single large COB is simpler to wire but harder to spread evenly.
LED driver
The driver is the most important electrical component you'll buy. MEAN WELL is the industry standard for DIY builds, and for good reason: their HLG and ELG series are reliable, well-documented, and designed specifically for LED loads. The HLG-60H-C series, for example, runs in constant-current mode with rated current options at 350 mA or 700 mA and holds current ripple to a maximum of 5%, which protects your LEDs from stress. For a larger build, look at the ELG-150 or HLG-240 series. These come in metal enclosures rated IP65 or IP67 (water and dust resistant), which matters in a humid grow environment. Many MEAN WELL drivers also support 3-in-1 dimming, which lets you tune output intensity with a simple potentiometer or 0-10V signal, a feature worth having.
Heatsink
Your LED boards will throttle and fail early if they run hot. A properly sized aluminum heatsink keeps junction temperatures in check. For quantum boards running at moderate power (say, a 200W build), a 12x12 inch or larger aluminum heatsink rated for passive cooling is usually sufficient. If you're running a high-power COB, active cooling with a small fan attached to the heatsink is a safer choice. Rule of thumb: if the heatsink feels uncomfortably hot to hold your hand against after 30 minutes of operation, you need more surface area or airflow.
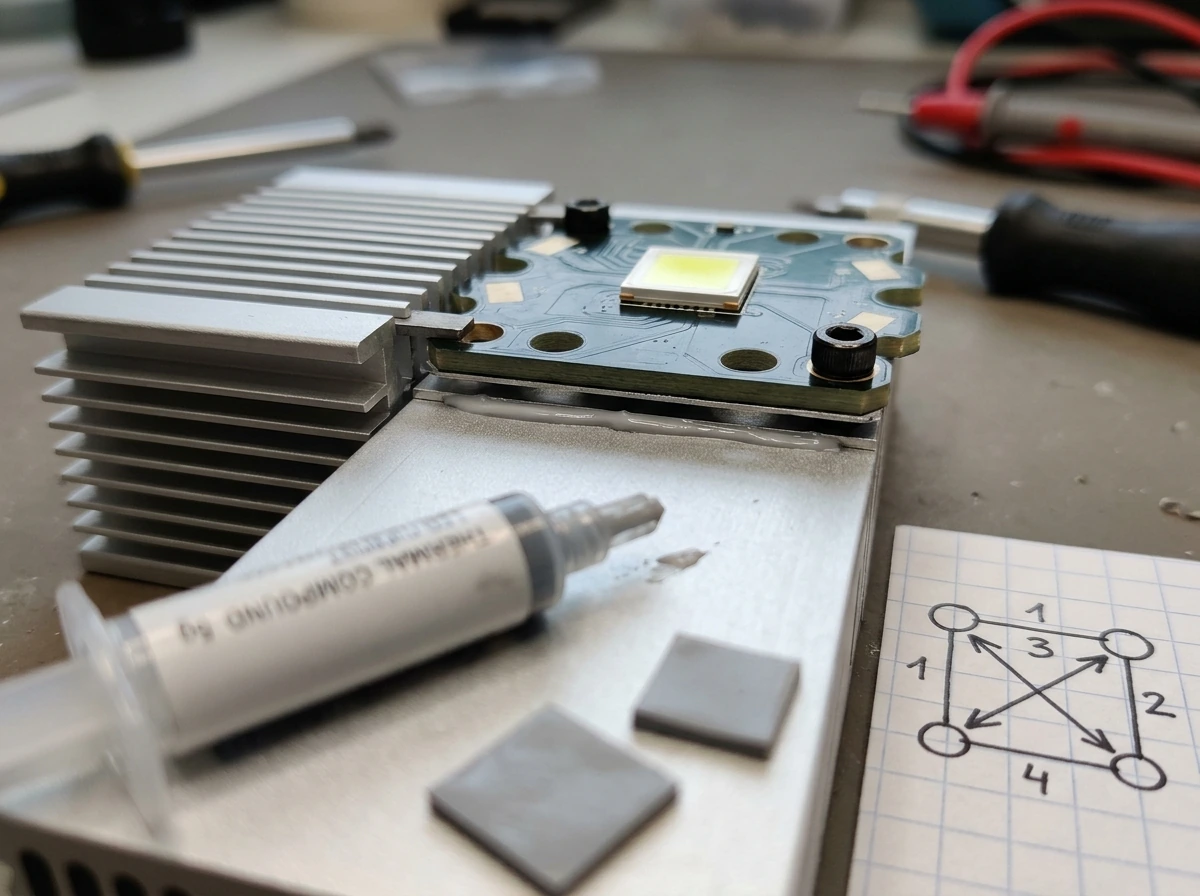
Thermal interface material (TIM)
This is the paste or pad between your LED board and the heatsink. It fills microscopic air gaps that would otherwise act as insulation. Apply a thin, even layer and mount with consistent clamping pressure across all fastener points. Uneven pressure creates hot spots that shorten LED life. Use the correct tightening sequence (alternating corners, not one side at a time) just as you would with any heat-sensitive electronic assembly.
Component comparison at a glance
| Component | Budget Option | Better Option | Notes |
|---|---|---|---|
| LED boards | Bridgelux EB strips | Samsung LM301H quantum boards | LM301H has higher efficiency per watt |
| Driver | MEAN WELL HLG-60H-C | MEAN WELL ELG-150 or HLG-240H | ELG adds IP67, dimming support |
| Heatsink | Passive aluminum extrusion | Finned passive + small fan | Fan needed above ~250W COB builds |
| Thermal paste | Basic Arctic Silver | Fujipoly or Shin-Etsu X-23 | Any quality TIM beats none at all |
| Wiring | 18 AWG silicone wire | 16 AWG silicone wire (high-temp) | Silicone insulation handles heat better |
Sizing the Light for Your Space and Plants
The metric you want to think in is PPFD: photosynthetic photon flux density, measured in micromoles per square meter per second (µmol/m²/s). This tells you how much usable light is actually hitting your plant canopy. Wattage is not a reliable sizing metric on its own because different LEDs produce different amounts of light per watt.
Here are the PPFD ranges to target by plant stage, which you can use to plan your build output:
| Plant Stage | Target PPFD (µmol/m²/s) | Typical Daily Hours |
|---|---|---|
| Seedlings / clones | 100–300 | 18 hours |
| Vegetative growth | 400–600 | 18 hours |
| Flowering / fruiting | 600–1,000 | 12 hours |
| Houseplants (low-light types) | 50–150 | 12–16 hours |
| Houseplants (high-light types) | 200–400 | 14–16 hours |
For coverage area: a 2x2 ft space (roughly 0.37 m²) needs around 100–200W of actual LED draw for flowering-stage intensity. A 2x4 ft space needs 200–400W depending on target PPFD. A 4x4 ft tent in full flower needs 400–600W. These are actual wattages drawn from the wall, not the inflated 'equivalent' numbers sometimes listed in marketing materials.
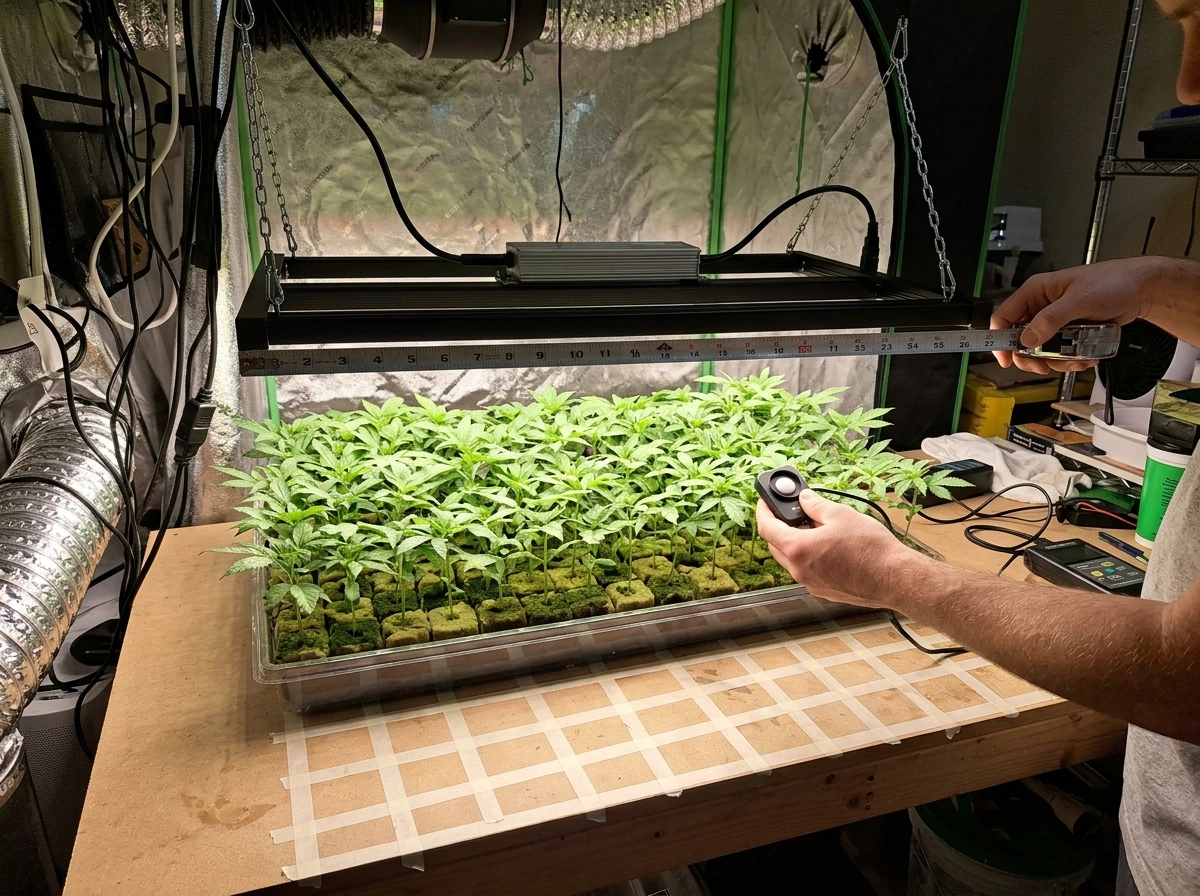
The best way to verify your build hits the right PPFD is a PAR meter. Measure at canopy level across at least five points (center and four corners), and test at different hanging heights. PPFD drops significantly as you increase distance from the light, so height tuning is where you fine-tune intensity without changing the driver output. If you don't own a PAR meter yet, borrow one, use a smartphone app as a rough guide, or watch your plants' response carefully over the first two weeks.
Wiring, Safety, and Mounting (the Actual Build)
This is the part people are most nervous about, and reasonably so. But LED driver wiring is low-voltage DC on the output side, which is much more forgiving than AC wiring. You're mostly dealing with 24–54V DC between the driver and the LED boards. Still, the input side is mains voltage (120V or 240V AC), and that deserves real respect.
Safety rules before you start
- Always work with the driver unplugged. Never probe live AC terminals.
- Use a GFCI-protected outlet for your grow light. Moisture and electricity are a serious combination in a grow tent.
- Use appropriately rated wire (16–18 AWG for most builds). Silicone-insulated wire handles the heat from both the driver and LEDs better than PVC.
- Ground your metal heatsink and driver enclosure. Run a ground wire from the chassis to your outlet's ground pin.
- Do not use damaged wire, stripped insulation, or improvised connectors. Waterproof LED connectors (IP65+) are cheap and worth using near plants.
- Secure all connections: no loose stranded wires, no exposed copper near anything conductive.
The safety standard that governs LED equipment (UL 8750) specifically addresses electrical insulation, grounding, overcurrent protection, temperature management, fire resistance, and mechanical integrity. You can't get your DIY build UL-certified, but you can follow the same logic: protect against shorts, manage heat properly, and make sure nothing can fall, arc, or overheat.
Step-by-step build sequence
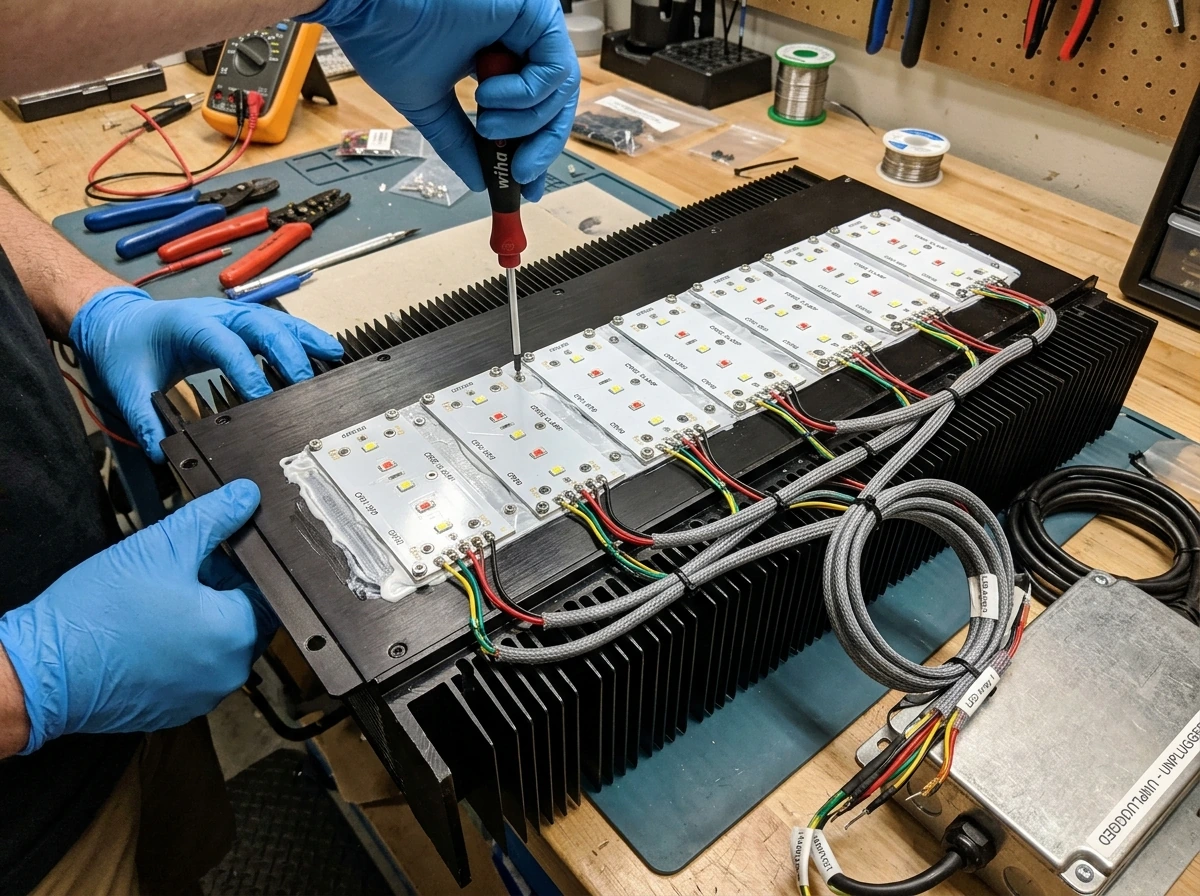
- Mount your LED boards to the heatsink using the correct fastener pattern and thermal paste. Torque evenly across all mounting points.
- Pre-wire the LED boards in series or parallel according to your driver's voltage/current spec. Check the driver datasheet: the HLG-60H-C series, for example, lists exact rated current and ripple specs that tell you how many boards it can drive.
- Mount the driver to the heatsink or a separate bracket, away from the LED board if possible (drivers produce their own heat).
- Run DC output wires from driver to LED boards. Keep wire runs short and tidy. Use strain relief at connection points.
- Connect the AC input wires to the driver (Line, Neutral, Ground). Double-check polarity before powering.
- If your driver has a dimming interface (the MEAN WELL 3-in-1 dimming uses a 0-10V or PWM signal), wire in a potentiometer or controller now before mounting.
- Power on briefly with no plants underneath. Check for heat buildup on the heatsink after 15 minutes. Check for any flickering or unusual dimming.
- Mount the assembly to your hanging system. Ratchet straps or adjustable rope ratchets are the standard for grow tents and make height adjustment easy.
Placement, Height, and Dialing In Intensity
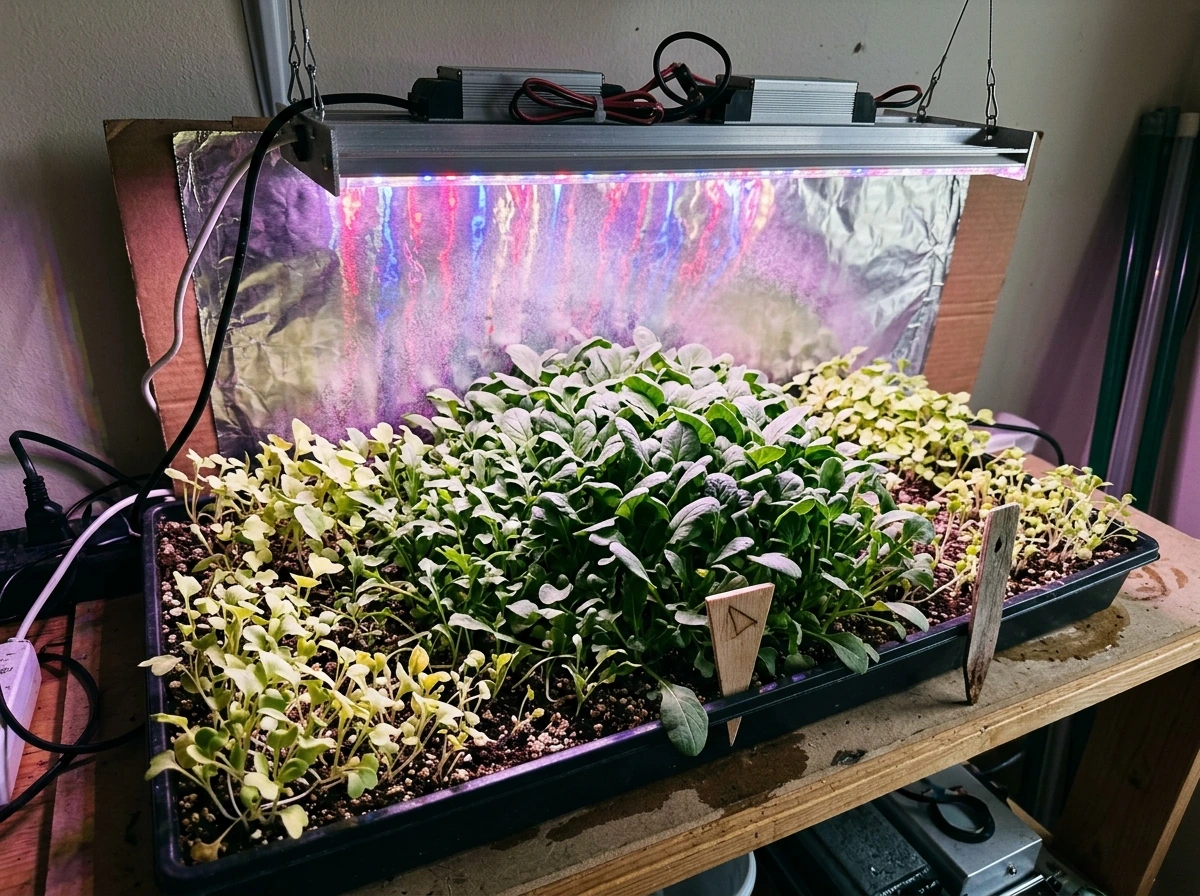
Once the light is mounted and confirmed working, placement is your most powerful tuning tool. Start conservatively: hang the light 24–30 inches above seedlings, 18–24 inches above vegetative plants, and 12–18 inches above flowering canopies. These are starting points, not fixed rules. Watch your plants, not just a chart.
Signs your light is too close: leaf edges curl upward, tips bleach or turn yellow-white, and growth slows or stops. Signs it's too far: plants stretch toward the light (etiolation), stems grow long and weak between nodes, and lower leaves get little benefit. The sweet spot shows compact, dark-green growth with short internodal spacing.
If your driver has dimming capability, use it. Run new seedlings at 40–60% output, then ramp up as plants mature. This also extends component life and lets you match intensity to what the plant actually needs rather than running everything at maximum all the time. If you don't have dimming, adjust height to manage intensity until you can verify PPFD with a meter.
For coverage uniformity, measure PPFD at the center and corners of your canopy. A reading that's more than 30–40% lower at the corners than the center means your light is too small for the space, hanging too high, or needs a reflective surround (Mylar or flat white paint on walls) to bounce light back in.
Timers, Schedules, and Getting the Light Cycle Right
Light schedule consistency matters more than most new growers expect. Plants use photoperiod as a developmental cue, and irregular schedules stress them. Get a mechanical or digital timer and set it once. Don't adjust it casually.
Here's how to think about schedules by growth stage: seedlings and clones do best on 18 hours of light per day. This gives them enough energy for strong early development without the stress of a shorter photoperiod. Vegetative plants also run well on 18 hours on / 6 hours off. Photoperiod-sensitive flowering plants (like cannabis) need a switch to 12 hours on / 12 hours off to trigger and sustain flowering. Many fruiting vegetables and herbs are day-neutral and can stay on 14–16 hours throughout their life. Houseplants generally do well on 12–16 hours depending on species.
| Stage | Light Schedule | PPFD Target | Notes |
|---|---|---|---|
| Seedlings / clones | 18 hrs on / 6 hrs off | 150–300 µmol/m²/s | Keep intensity lower; they're sensitive |
| Vegetative (photoperiod) | 18 hrs on / 6 hrs off | 400–600 µmol/m²/s | Standard veg cycle |
| Flowering (photoperiod) | 12 hrs on / 12 hrs off | 600–1,000 µmol/m²/s | Strict 12/12 triggers and maintains flower |
| Herbs and day-neutral plants | 14–16 hrs on | 200–500 µmol/m²/s | Adjust by plant response |
| Low-light houseplants | 12–14 hrs on | 50–150 µmol/m²/s | Many tolerate lower schedules well |
One practical tip: set the lights to run during the coolest part of the day if your space gets warm. In a tent or small room, LED heat is manageable, but stacking it with midday ambient heat creates problems. Running lights from early morning through afternoon, with the off period in the evening, works well in most setups.
Troubleshooting and Upgrading Your Setup
Even well-built lights have issues. Here's a practical breakdown of the most common problems and what actually causes them.
Plants are stretching or look leggy
This almost always means insufficient light intensity at canopy level. Lower the light by 3–4 inches and reassess after 48 hours. If you're already at minimum safe distance, you need more output: either a second board, a higher-powered driver, or a larger build. Don't mistake CO2 or nutrient issues for a light problem, but stretching between nodes is a strong light signal.
Uneven growth across the canopy
Plants near the edges of your light footprint get less PPFD than those in the center. Solutions: raise the light slightly to widen the footprint (at the cost of some peak intensity), add reflective walls to bounce light back in, or add a second light module covering the edges. If you measured your corner PPFD and it's less than 60% of center readings, add coverage before adjusting anything else.
Light flickering or unexpected dimming
Flickering from an LED grow light usually points to the driver, not the LED boards. The most common causes are overheating (the driver enters thermal protection and throttles output), a failing electrolytic capacitor inside the driver, or a loose connection. Check that the driver has adequate airflow and isn't enclosed in a hot space. MEAN WELL HLG-series drivers have a case temperature limit of up to +80°C, and exceeding that triggers shutdown-and-recovery protection. If the driver is running hot to the touch, improve ventilation around it. If flickering continues after the driver cools, the driver may need replacement.
Heat issues on the heatsink
If the heatsink is getting uncomfortably hot (above roughly 60°C), your thermal path has a problem. Check that the thermal paste layer is thin and even, fastener torque is consistent, and there are no gaps between board and sink. Adding a 120mm case fan blowing across the fins drops heatsink temperature significantly and buys you headroom for higher-power operation. This is the cheapest upgrade available if you're running near thermal limits.
Output seems low or plants aren't responding well
First, confirm your driver is set to the correct current output. Many MEAN WELL drivers have an internal or external trim pot for current adjustment. If it was shipped at minimum current and never adjusted, you may be running at 60–70% of rated output. Check the datasheet, find the trim adjustment, and set it properly. Beyond that, verify your light schedule is actually running correctly: it's surprisingly common for a timer to be set wrong, especially after a power outage.
Upgrading incrementally
The nice thing about a modular DIY build is that you can upgrade in steps. The most useful upgrades in order of impact are: adding a second LED board and upsizing the driver (doubles your coverage or intensity), adding a dimmer controller if your driver supports it, adding a PAR meter to stop guessing at PPFD, and switching to a programmable timer with sunrise/sunset ramping for more natural light transitions. If you find yourself wanting to expand significantly, look into building a dedicated grow light stand so you can run multiple panels across a larger area cleanly. And if aesthetics matter in your space, there are practical ways to make grow light setups look intentional rather than improvised.
One thing worth saying plainly: your first build will not be perfect. You'll probably adjust height three times in the first two weeks, tweak the schedule, and wonder if you got the driver right. That's normal. The advantage of building your own system is that you understand every component, which makes troubleshooting straightforward. Stick with it, measure what you can, and let the plants tell you what needs adjusting.
FAQ
Can I mix different LED boards or COB chips in the same diy grow light setup?
Yes, but only if you verify the driver output matches your LED boards’ voltage range. Use the driver’s constant-current spec (and, if present, the forward-voltage window from the datasheet) to confirm it can push the rated current through your specific quantum-board or COB wiring. If you accidentally combine mismatched series/parallel strings, the driver can run out of compliance voltage and the LEDs may underperform or fail early.
What’s the safest way to wire 2x4 or 4x4 builds using multiple boards to one driver?
For most first builds, aim for fewer components and avoid overcomplicating stringing. The simplest approach is 2 boards on one driver if you want broad coverage on a 2x4, but do not exceed the driver’s rated current or voltage compliance. If you use dimming, remember it reduces intensity, not PPFD uniformity, so you still need correct layout and adequate heatsinking.
How should I test my diy grow light setup before running it full intensity?
You can damage LEDs by leaving power on while you test wiring, especially if there’s a short or a polarity mistake. Before powering, do a continuity check with the power disconnected, confirm your LED board connections are tight, and start with a low driver current or reduced dimmer setting. After power-on, monitor driver and heatsink temperatures at least 30 minutes.
What are the most common safety mistakes when wiring a diy LED grow light driver?
Most “DIY wiring” risk is on the AC side. Use a proper strain relief, a grounded metal enclosure or safe mounting method for the driver, and a correctly sized fuse or breaker upstream of the driver. Also keep mains wiring away from the heatsink fins and any exposed metal parts that could shift when the light is hung.
If my canopy center is bright but corners are dim, should I rely on reflectors or change the light layout?
Mylar and flat white walls help a lot with edge uniformity, but reflections cannot fix a badly oversized light footprint. If corner PPFD is far below center, you’ll get better results by adding another board or reducing hanging height, then use reflectors as a secondary boost. Don’t assume “more reflection” replaces proper sizing and mounting.
I don’t have a PAR meter yet, what should I measure or watch to avoid overdoing intensity?
A PAR meter is best, but if you must start without one, use plant response carefully and avoid daily guesswork. Take note of internodal spacing and leaf color over the first 7 to 14 days at a fixed hanging height. If you later buy a meter, re-check at center and corners, because uniformity problems often exist even when plants look “healthy.”
Can I connect my diy grow light driver to a smart dimmer or automation controller?
Yes, but only within the driver’s dimming method and control range. Some drivers support 3-in-1 dimming (potentiometer or 0-10V), others expect specific signal wiring, and incorrect signal wiring can cause flicker or erratic output. Confirm the driver’s dimming spec and polarity before connecting any controller.
My diy grow light flickers. How do I tell whether it’s a driver issue or a wiring issue?
Flicker can be from the driver entering protection, overheating, unstable input power, or a failing internal component. First check the driver case temperature and airflow, then inspect all connector seating, then verify your timer and any dimming signal. If flicker continues after cooling and tightening, plan on driver replacement rather than repeatedly re-adjusting height.
What should I do first if seedlings show light stress or stretching in my diy grow light setup?
If seedlings look pale or tips bleach, raise the light or reduce output immediately. If they stretch, lower intensity is not the only fix, you also likely need to reduce distance to bring PPFD up. A practical method is to change one variable at a time (height or dimming), wait 48 hours, then reassess rather than changing both at once.
How can I prevent photoperiod problems after power outages with my diy grow light timer?
Power outages often reset mechanical timers or disrupt programmable schedules, leading to irregular photoperiods. After any outage, verify the actual on and off times, then check dimmer position and driver mode. For flowering plants, inconsistent timing is more likely to delay or destabilize flowering than occasional intensity changes.
Is it okay to run my diy grow light 24/7, or should I stick to a schedule?
You can run LEDs continuously, but most growers avoid 24/7 because plant photoperiod still affects development cues. If you use dimming, it does not replace a proper schedule, it only lowers intensity. For long-term reliability, keep the thermal design conservative and avoid running at maximum output every day unless you have verified temperatures with a thermometer.
How do I decide when I need passive cooling versus adding a fan to my diy grow light?
Choose the heatsink and airflow based on how hot the system runs under your actual driver current. A quick decision aid: if the heatsink surface is uncomfortable to touch after 30 minutes, improve thermal transfer or add fan airflow before increasing power. Also re-check thermal interface material thickness and mounting pressure when you change boards or fastener tension.
Next Article
How to Build Grow Lights at Home DIY Step by Step
DIY grow lights step by step: build LED panels or full systems, wire safely, mount right, tune spectrum and troubleshoot